

|
|
 06-21-2018, 08:17 AM
|
#81 |
|
.
Join Date: Mar 2004
Posts: 13,514
|
Let me just reiterate again how cool all of this is. And how envious I am of you having the knowledge, tools, and time to devote to such projects. Thanks for taking the time to post everything as you go, too. I find it very interesting.
 |

|

|
|
06-21-2018, 09:11 AM
|
#82 |
|
Alphanumeric
Join Date: Aug 2005
Carmudgeonly Ride: 981S, 340i
Posts: 9,584
|
I meant it in a good way... It is quite incredible, a definite one-of-a-kind FrankenCar. Do you plan to register it or keep it competition only?
|
|
|
|
|
06-21-2018, 10:20 AM
|
#83 | |
|
No more BMWs
Join Date: Apr 2005
Carmudgeonly Ride: Ram, MS3, CX-5, RX-8
Location: Glenwood, MD
Posts: 14,753
|
Quote:
I don't plan to register it. It won't have any emissions controls and I'm running an aftermarket ECU so it won't have OBD-II diagnostics. When it's old enough that I can get Historic plates for it I may tag it just so I can go play with it more often. But that's several years off (20 year rule in Maryland, so 2024) |
|
|
|
|
|
06-23-2018, 05:32 PM
|
#84 |
|
No more BMWs
Join Date: Apr 2005
Carmudgeonly Ride: Ram, MS3, CX-5, RX-8
Location: Glenwood, MD
Posts: 14,753
|
One of my big concerns on this project was whether the Miata steering rack would fit. It does, but there is a fitting on the rack that interferes with the front pulley. It's one of the directional high-pressure lines from the spool valve. These are hard lines (basically brake lines but carrying PS fluid) that run from the spool valve to the rack. Pic below shows the fitting with the line removed. When the line is installed it sticks up about two inches, because you can't really make tight radius bends with brake lines.
 Other than that, the rack fits perfectly and doesn't interfere at all. I think what I'll end up doing is converting that fitting to a banjo fitting with crush washers and then running a flexible, braided line to the spool valve. Sort of like this: 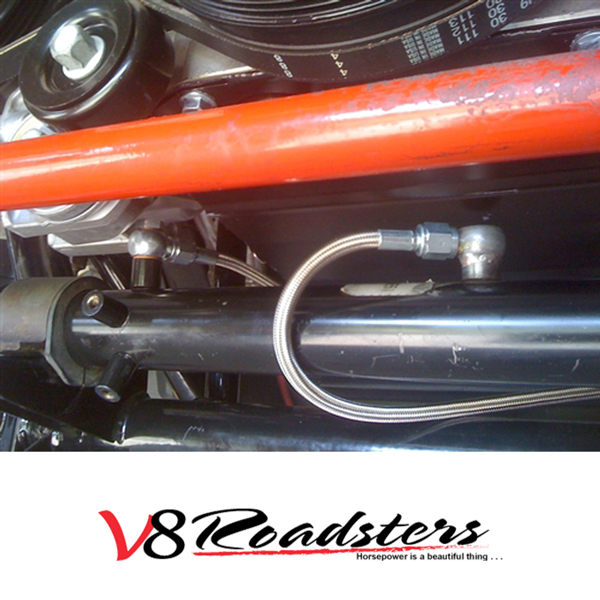 Anyway, when I had the rack out I noticed that the two bushings on the driver's side are super soft rubber. I hate compliance in steering and suspension when it comes to autocross cars, so I made up a couple of delrin bushings and re-used the stock Miata metal inserts from the rubber bushings (with the rubber burned off  ). ).  |
|
|
|
|
07-01-2018, 06:45 PM
|
#85 |
|
No more BMWs
Join Date: Apr 2005
Carmudgeonly Ride: Ram, MS3, CX-5, RX-8
Location: Glenwood, MD
Posts: 14,753
|
Today was a day I was kind of dreading. It was to be ABS module relocation day. The location of the RX-8's ABS module (pump) is unfortunate. It's on the driver's side of the engine bay, next to the shock tower. The problem with that with a four-cylinder in the engine bay is the intake manifold wants to occupy the same space. So it had to move. The intake manifold is off in this picture because, well, it doesn't fit with the module there.
 I had a couple choices. One, I could move it about three inches towards the shock tower but keep it in the same general area and orientation. Two, I could move it rearward (towards the firewall) and next to the master cylinder. First I marked all of the lines and pumped the brake fluid out of the system, then disconnected all of the lines. Then I re-installed the intake manifold to see what I had to work with.  I realized I had another problem. This intake manifold is designed for a Miata engine bay, and the Miata fuse box is much smaller than the RX-8s. The throttle body would be right where the fuse box is. You can see the black plastic top for the fuse box in this picture, in the lower right.  The intake manifold I picked up was really designed for a naturally-aspirated application, but it looked like a good, high flowing design for a turbo application, so I picked it up used from the prior owner. The manufacturer had problems with the runners cracking where they met the flange that bolts to the cylinder head, so for this particular manifold they cut the runners and mated them with silicone joiners (with a weld bead run around them so the hose clamps would have something to shoulder up against. This is kind of handy for me, because I could cut the runners a little more and move the manifold closer to the engine to gain more clearance. I'll have to TIG a bead around the runners again at some point, but I gained 1.5" of clearance to the fuse box, which should be good.  That problem solved, I started putting the ABS module in various places and orientations to see what would work best. It looked like option 1) made the most sense - I could re-bend each brake line to fit, then make a new bracket for the module. The two lines coming from the master cylinder were easy - I could remove them from the master cylinder and the ABS module, take them to the vise, straighten various bends and re-bend them around a 19mm socket without risk of kinking them. The rest of them were kind of a puzzle. Once I had the ABS module where I wanted it, I started mapping out where I wanted each line to go. I needed to reduce the height coming off the module and move all the lines closer to the shock tower so they wouldn't interfere with the plenum. I didn't take a ton of pics, just a couple of the final product. All the lines fit great and I can get the intake manifold on and off with no issue now.   Last task was to install the control arms and shocks. The lowers had spherical bearings installed by a guy who does that for a living. The uppers just got offset delrin bushings for more camber. The shocks are Penskes that I picked up for a song off of a Miata guy (valving is all wrong, but I got a guy for that). I put the brake rotors on and mounted up a couple of 315/30 Hoosiers to test fit those.  Pimpy spherical bearings. Yum.  Couldn't resist throwing the front fenders back on and seeing how it looks. Ride height is a few inches too high, but it still looks badass, I think!  Long day working in 90 degree heat, so I'm done for the day... |
|
|
|
|
07-02-2018, 09:54 AM
|
#86 |
|
Chief title editor
Join Date: Oct 2003
Posts: 26,599
|
Oh, wow!
__________________
OH NOES!!!!!1 MY CAR HAS T3H UND3R5T33R5555!!!!!!1oneone!!!!11 Team WTF?! What are you gonna do? 
|
|
|
|
|
07-02-2018, 11:17 AM
|
#87 |
|
Mugwump
Join Date: Oct 2003
Carmudgeonly Ride: E46 330i, Chevy Colorado, Tesla Model 3
Location: NY
Posts: 17,475
|
a) wow
b) Was keeping the ABS required? or desired? |
|
|
|
|
07-02-2018, 11:43 AM
|
#88 |
|
No more BMWs
Join Date: Apr 2005
Carmudgeonly Ride: Ram, MS3, CX-5, RX-8
Location: Glenwood, MD
Posts: 14,753
|
I can't think of a reason that I wouldn't want it. The RX-8 has one of the best ABS systems in existence (even today). It would be really challenging to drive without ABS.
|
|
|
|
|
07-05-2018, 10:32 PM
|
#89 |
|
Crotchety
Join Date: Aug 2007
Carmudgeonly Ride: 22 Tiguan, 11 328i
Posts: 912
|
Still following closely, excited for the finished product!
|
|
|
|
|
09-17-2018, 07:13 PM
|
#90 |
|
No more BMWs
Join Date: Apr 2005
Carmudgeonly Ride: Ram, MS3, CX-5, RX-8
Location: Glenwood, MD
Posts: 14,753
|
Man, July? I need to get back into this. I've actually done a lot of stuff in the past couple months.
I got my bellhousing and transmission installed and realized quickly that I would have to stand the engine up rather than run it with the 10 degree tilt, like in a Miata. The reason for this is the bellhousing that adapts the transmission (3rd gen RX-7 twin turbo) to the engine (Mazda 6 / Ford Fusion) is designed to have the engine perfectly vertical. This actually helps me, because it solved a minor interference issue I had with the steering rack near the front of the motor. I test fitted the transmission and made a strap to hold the tail of it in the right place.  Kind of amazing that the shifter hole lines up just about perfectly. The transmission will move forward about a half an inch from where it is right now, and a stock FD RX-7 shifter should work well.  Like the new oil pan? It's from a Ford Ranger, which came with a version of this engine. Perfect clearance all around. And uses a stock Ranger pickup, dipstick and dipstick tube. Really simple. Only downside is it isn't internally baffled, but I can have some baffling done later on.  Oil Pan clearance to the steering rack is good.  I think I have everything in place to fab the engine mounts. The engine is about an inch from the firewall at the closest point. The engine is as low as it can go and still clear the steering rack and the subframe, though just barely. The oil pan is not hanging down below the subframe. The transmission is at roughly the right angle relative to the differential. A side note that makes all this challenging is that the transmission and differential need to be at the same but opposite angle. In other words, if the transmission is pointed five degrees down, the differential needs to point 5 degrees up. U-joints only operate at constant velocity if both angles are equal. CV joints (like in a car with independent suspension) don't have this requirement. I made a couple of plates to bolt to the engine. I'll join the plates to the (stock Miata, for now) rubber engine mounts using some 1.5" OD, 3/16" thick steel DOM tubing.  I ordered an electric power steering pump from a Toyota MR-2 Spyder to power the steering rack. The factory Miata steering pump won't fit with the turbo plumbing, and the electric pump lets me move weight to the trunk to improve the weight distribution. I ordered it from a salvage yard and it should be here this week, so I can start making a mount for it. Which brings me to my newest toy... a MIG welder! I haven't welded anything in a long time, so I'm way out of practice. Mostly I just need to tack stuff together so one of my talented friends can TIG it the rest of the way, but having a metal glue gun is essential for engine mounts and other brackets. Fun!!  Last edited by John V; 09-18-2018 at 07:02 AM. |
|
|
|
 |
| Bookmarks |
|
|


 Linear Mode

